Cash is Good!

I have taken a part-time job, and it's definitely affecting my blogging time. I'll continue to post here as I am able.
Showing posts with label tech tips. Show all posts

Friday, April 13, 2012

Free Kindle App for iTouch


I have an iTouch 2... someone's castoff. Using Stanza, I can use it like an e-reader for books in the ePub format. However, I recently wanted to take advantage of a free Kindle book, and wondered if I could read it on this device.

Of course, there is the free Kindle app for PCs, but I like the portability of the iTouch. As it turns out, there is a way to read Kindle books on the iTouch. You lose some of the features, but it works fine for basic reading.

It did take me a while to find it, and figure out how to use it. I had to search through the iTunes Apps interface. I put in Kindle, and it brought up a free app that works on iPhones and iTouch. It was easy to download in the same way as any other app.

However, I still had to get my Kindle books on it. I already have the Kindle for PC app on my computer, and I couldn't figure out how to get the books from it to the iTouch. Turns out that's not the way to do it at all.

Instead, on the Amazon site, when you download your books, choose to read on the iCloud. I figured this out because once I had the app on the iTouch it was asking me if I wanted to read books from the Cloud, but there was no way to say "yes" from the iTouch.

Anyway... here's a real techhie specific tip (not!). Once I chose to view the book in the cloud, all my Kindle books appeared on the iTouch like magic. I'm not going to dissect success. I can only tell you what happened for me.

I can't change the font size, or make any notes or highlights, but I can read the books. That was my primary goal.


Monday, January 23, 2012

Notifications for Moderating Comments on Blogger


I'm posting this because I just discovered (face all red) that there were 14 great comments, not spam at all, from you faithful readers that had not been approved because I goofed.

I had not entered my email to receive notification of comments that needed to be moderated. I ran across them today while looking at my Blogger Dashboard.

So, in case you have also neglected to enter an email where comment notifications should be sent, here's how. From your Blogger blog's dashboard, click on Settings. It has a picture of a wrench. (It's not under Comments.) Then Click on Posts and Comments.

Then you will see all your options for how you want the comment box to be displayed, who can comment, how much you want to moderate, etc. There is a box where you need to enter your email, if you want to be sent notifications.

Really easy... one just has to do it.


Saturday, January 7, 2012

Inporting CSV Files into Gmail


Are you trying to import an address book from some other email program, or from Google Groups into Gmail? It can be pretty frustrating when you follow the directions and it won't work.

The Google Help file only says to save your other mail list as a comma-delimited file, and then import it into Gmail. Even if you know what that means, it may not work. Why?

First of all, a comma delimited file just means a file where each item that would go in a spreadsheet field is separated by a comma. For example,

NameAddressemailPhone
Joe Smith800 W 4th Stjoe@mail.com555-555-5550
Jane White sweetgirl@mail.net555-555-5551
would simply be: Name,Address,email,Phone,Joe Smith,800 W 4th St,joe@mail.com,555-555-5550,Jane White,,sweetgirl@mail.net,555-555-5551

Notice that since we don't know Jane's address there are simply two commas with nothing between them.

So, the first step is to export your address list from whatever source you want and choose to save it as a comma delimited file. This will have the file extension CSV. Let's pretend we named this OLDBOOK.csv

Now, open your Gmail account and put in a couple of contacts manually. Anything will do- if you make duplicates you can always delete them later. Do put something in each field that you plan to use, including any custom ones you want to create. Now export this as a comma delimited file (extension CSV). Let's pretend we named this NEWBOOK.csv

Open both files in Excel. Now you can see the contents of each address book. You must use the format from the Gmail file to make a CSV file that it will read.

Use the NEWBOOK.csv as a template. You must fill the fields you want from your OLDBOOK.csv. You can just copy and paste each column, but make sure you paste them in the correct row, or all your addresses (for example) might be one entry off when you import the file. Save the NEWBOOK.csv file you just added to.

Now, this file will have all your address info, and it will have it in a form that Gmail wants. From your Gmail account, import this file, and all your data will be there!


Thursday, January 5, 2012

Choose Where to Download Files in Firefox 6,7,8,9


Have you downloaded a new version of Firefox (I believe this info is good for Firefox 6,7,8 and 9) and discovered that it wants to put files you download in a place you don't want or can't find? The default is in the Downloads Folder, which is under "Users" in Windows 7, or YourName Documents in Windows XP.

It's easy to change this. Find the orange bar in the upper left that says "Firefox." Click on it and then on the Options choice.

This will open the box you see in the second image here. If "General" is not the selection that shows, choose it now (the one that looks like a light switch). Then, in the middle of the box, you can select whether you want downloads to go to the file of that name (and whether you want the downloads window to stay open or close), Or if you want to specify a different location to be used all the time, or if you would like to be asked every time.


I dump downloads on my desktop. That way I can find them easily, and then move them or trash them after I've looked at the file.


Wednesday, November 2, 2011

Working Around Errors Uploading Images to Blogger


The extremely annoying problem of not being able to upload images with Blogger (discussed at Error Uploading Images to Blogger) can be worked around.

First open your Picasa page. Maybe you didn't know you have one. But if you've been using the blogger image uploader, you do. That's where they are stored. Go to this URL https://picasaweb.google.com/home . If you are logged into your Google account it will automatically bring up the various blogs you have under that ID. Click on the blog you want to add a picture to.

Then choose "Add Photos." I've circled it in the image below that shows my Picasa page for Grazing the Ditches


This will take you to a screen where you can either drag the image from your folder into a large box, or browse your files to find it. When the image (or several) shows in the box, click OK in the lower right corner. This will throw you back to the upload screen.

Now you need to get back to the album you want. The only way I've seen to do this is click on the Home tab, and then the Album for the blog I just added to. Once you have that open, the picture you just added should show in the thumbnails. Click on the image and it will open in a larger size. You can then right click and choose Copy Image Location (or whatever your browser calls it).

Paste this into your blog.

If you don't know how to code it to show up, follow this example: <IMG SRC="http://your-picture-url.jpg"> (or gif, etc. insert the correct URL for the image)

You can force it to align to the left or right by placing the following between IMG and SRC: ALIGN="LEFT" (or right)

These commands to not need to be in capital letters. I just did that to identify them as tags.

Of course it would be nice if the uploader would work, but this makes it possible to post when we are ready, not when Google decides to work.


Sunday, October 30, 2011

Error Uploading Images to Blogger


Have you seen this message? I've been using blogger for 3 years now, and had never been stung by this until this month. Now, I'm getting it a lot. Of course it's annoying, but even more annoying is the length of time the problem has been ongoing. It's particularly maddening if you are trying to upload several pictures because it kicks you back to having to start all over again, and get all the images from your computer back into the interface. This can take several minutes if they were not all located together on your computer.

I found reports of this problem from as long ago as Sept 2009 in the Blogger help forums. Google has not provided any real answers, and has closed threads where people have reported it.

Apparently it became critical in June 2011, because on June 29, Google posted it on their "known issues" blog and said "Update, 10:50AM PST: We've released a fix and image upload should be working again without issue. Thanks for your patience."

As many of us have discovered, it's not really fixed, and it means that it's difficult to complete a blog post when one wants to do so, if there are pictures to display. The image on this post is being hosted on server space of my own. I was unable to load the image to blogger. I'm also waiting for this to post to another blog.

It's nice to have free image hosting space, but not nice to have so many problems.


Sunday, July 24, 2011

How to Add Google +1 Button to Blog Posts

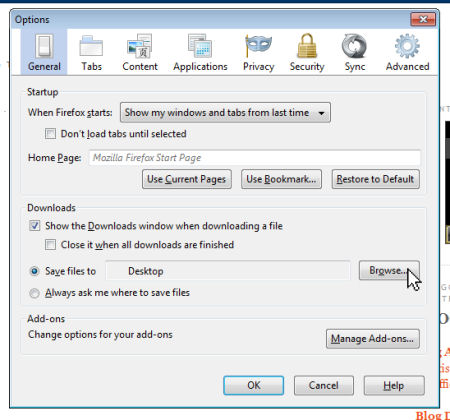
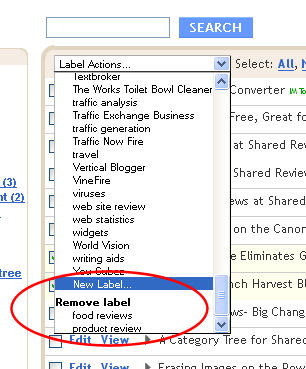
If you have see the Google +1 button on some blogs and other sites, but it doesn't appear on yours, maybe you would like to add it.

Google Plus One is a new way of indicating that you like an article, similar to the thumbs up or "like" on Facebook. It connects to the new Google Public Profile interface. At this point, you need to be invited to join this, but you can consider yourself invited, by clicking http://gplus.to/sharkbytes.

If you would like to add the button to your blog, here's how. You need to add one line of code to the blog HTML template. The easiest place to put this is right before the </body> tag- just scroll to the bottom of the template, and you'll see this. Add the following code <script type="text/javascript" src="https://apis.google.com/js/plusone.js"></script> Don't forget to save the template! (It can be placed in the <head> if you prefer.)

Then, in the post where you would like to have the button show, add this <g:plusone></g:plusone>

You can see that I successfully added it to this post. If you want it to appear in every post, make it easy on yourself and put the <g:plusone></g:plusone> code in your post template- that template of items that you want to show in every post.

You can also add the Google+1 icon to regular web sites, using the same method.

If you found this helpful, maybe you would click the +1 button below for me!

Google +1 FAQs

Thursday, June 2, 2011

Broken Control Key - Now What?


control key

So, the Control key on my laptop keyboard is dead. Not dirty, dead, D-E-A-D. I'm a keyboard person. Do you have any idea how annoying that is?

How to get the Task Manager? Right click on the Task Bar (the bar at the bottom of the screen) and choose Task Manager. Or, do Start > Run > taskmgr.

Copy? You can use the mouse to highlight and then choose Edit/Copy, and the same to then paste it. Puleeeze! Too slow. Highlight, right click choose Copy, and then the same to paste it. A tiny bit better.

I am waiting anxiously for my next credit card cycle so I can get this keyboard replaced. Meanwhile, I've can at least limp along until I have Ctrl+Alt+Del, Ctrl+C and Ctrl+V back!

Saturday, April 23, 2011

Find Your Amazon Listmania! Lists


Why is it so hard to find Listmania! Lists on Amazon? They encourage people to make them and then make it impossible to find.

Listmania! is a great idea. You can make a list of any sort of collection of books that you want, and then other people can see your selection. I've made two lists:

Adventurous Women
and Books by People I Know Personally

But once you make them... it's like they disappear into a black hole. Here's how to find your lists, so you can edit them.

• When you sign in at Amazon, click on Your Account in the upper right corner.
• Scroll down to the section marked Personalization
• Under Community, click on "Your Public Profile"
• If you have written any reviews and/or created Listmania! lists, they are accessible under the labeled tabs

If you have not created any Listmania! lists, it's fun! Create a Listmania! List

Thursday, April 14, 2011

Creating a Category Tree for Blogger - Part 3


Part 3 - How to Work with Labels

Over the life of your blog, you may have chosen and used labels carefully, or you may have been more willy-nilly. Either way, there are bound to be changes needed when you want to organize better. It's quite simple to add, remove, or change labels in Blogger/ Blogspot.

First of all, you need to choose the Posting Tab, and Edit Posts. That will present a list of your existing labels on the left and your posts in the middle (maybe multiple pages of them, if your blog has been around for a long time).

To add an existing label to a post

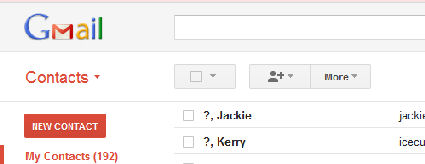
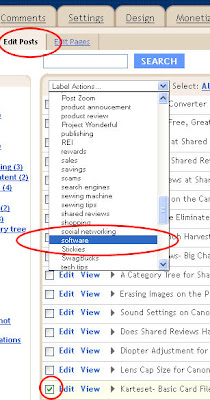
First, you need to mark all the posts to which you want to apply the existing label.

If these are likely to be a subset of some other label, you can click on the label in the Labels column, and only the posts with that label will be listed on the right. You can also use the search box, which is above the list of posts to help you narrow the choices.

If none of these help, you can just do a "brute force" visual scan of the titles. If you miss labeling some post on the first pass, it's no big deal to catch it another time, or to fix one that you might find later. But the better the job you do with your labeling, the better your category tree will be.

To add an existing label:
1. check the little box beside the post(s)
2. pull down the list of Label Actions and find the label you want
3. click on it, and your checked post will have that label applied

To add a new label to a post


This process is very similar:

To add a new label:
1. check the little box beside the post(s)
2. pull down the list of Label Actions and find New Label
3. click on it, and a little box will appear
4. enter the new label and click OK


To remove a label from a post
1. check the little box beside the post(s)
2. pull down the list of Label Actions and find Remove Label at the very bottom
3. click the label you wish to remove
4. note that if a label is removed from all posts, it will automatically be removed from the list. There can be no labels with zero posts.

If, immediately after doing one of these actions, you realize that you made a mistake, there is an Undo link at the top of the Posts column which will allow you to reverse the last action.

With these tools, you should be able to add good labels to your posts in Blogger/ Blogspot, and remove poor ones.

The next topic is Part 4- How to Code the Tree

Category Tree Tutorial Index

Tuesday, February 8, 2011

Blogger Photo Uploader Rotates Pictures


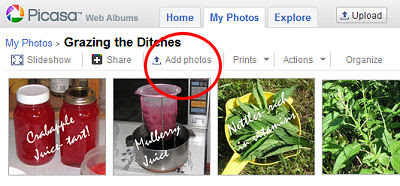
A widespread problem is occurring when uploading photos through the Blogger/Blogspot platform. Pictures often auto-rotate to an orientation that you don't want. Efforts to resave the photo and upload again don't seem to do much. I uploaded this humorous shot three times for use on another of my blogs, and it simply refused to load in landscape mode.

There are many theories as to why this is happening, with no real answers. Google has pretty much ignored people's questions on their forum, since the issue was first reported in March of 2010.

Meanwhile, other users have suggested a number of ways to fix this, but only one of the suggestions really works consistently. Here is the best way to deal with the problem.

The way Blogger hosts your pictures is through a private Picasa Album. Using your Google ID, log into Picasa and click on My Photos. You will discover that each of your blogs (if you have more than one) has its own album. Click on the correct one.

You can then locate the picture that is rotated. Click on it, and it will expand. Then in the upper right corner you will see a button marked "Edit." Click it. This will launch the Picnik editing application. You can then rotate the photo to the way you want it to be. Save it back to your album.

Then you can right-click on the photo and get it's URL to use in your blog post. This is a ridiculous amount of work to deal with a problem that you didn't cause, but it's the only reliable solution.

If you are able to host your photos somewhere else, and not use the Blogger uploader at at, this would be the ideal solution.

Picasa
Blogger forum

Friday, November 26, 2010

Video Made in Windows Movie Maker Won't Upload to YouTube?


Have you edited or created a movie in Windows Movie Maker, tried to upload it to YouTube, and received the cryptic message "Unable to upload for unknown reason?" Yesterday, I learned one possible source of the problem. If you have created an extra audio track, such as a voiceover, read on.

When I went exploring for possible reasons why my video seemed to be uploading to YouTube just fine until the very end, I discovered that one possibility was that the audio and video tracks were not of the same length.

After a lot of fooling around, trying unsuccessfully to get my voiceover track and the dual video/audio track from the camera to end at the same 100th of a second, I tried another solution, and this one worked.


This is what the timeline will look like when there is a problem. My voiceover track is the bottom bar. Note that it extends beyond the camera track. Your video will play perfectly on your computer, but YouTube won't take it.


To fix this problem, just leave the camera video/audio track a little longer. Those tracks are synced internally, and will always end at the exact same time. I managed to achieve this by inserting another tiny clip of film, which you can see, just before 1:58:00 on the timeline. The timeline is expanded, so this clip is only about 1/10 second long, but it made all the difference. YouTube accepted the video in which the camera track was longer than the voiceover track.

Windows Movie Maker is an extremely basic video editing software, but, even so, good things can be accomplished with it.

Thursday, September 23, 2010

Set Search Bar Default in Firefox


Does your preferred search engine in Firefox sometimes revert to one that you don't want to use all the time? This can easily happen when an update is performed, or sometimes if it locks up and has to be shut down by the system.

This is an annoying little problem. It's easy to pull down the list and click on the one you want, but how do you get it back to being the default search preference?

Using the picture above as a guide, you will notice that at the bottom of the list is a choice called Manage Search Engines. Click on that and you will see the box as below.


Then you can select the search engine preference you want and move it to the top of the list. That will make it the default search engine choice. You can order any of the others as you wish, too.

This is very simple, but it's difficult to find the instructions for how to actually do it.

Saturday, July 17, 2010

Recovering Lost Stickies


A few days ago I told you about a great little piece of Freeware called Stickies 7.0. But I mentioned that there was a bit of an issue with apparently losing all of your stickies on occasion. For some people (like me) who really use this software to organize their life, that can be a real problem!

The first time it happened I angrily headed for their support forum, and discovered that the recovery is simple. Ahhh.... something that works, and is easy to fix when it does break. Software doesn't get much better than this.

Here's how to recover if your stickies suddenly come up blank. First, you need to be sure that your display options are set to show hidden files and folders. To do that, click Start/ Control Panel/ Folder Options/ View/ Show Hidden Files and Folders. If your settings do not allow for these to show, the path to the stickies recovery folder will not show up.

Now click on My Computer / C: / Documents and Settings/ Your User Name/ Application Data/ stickies. If Application Data is not in the list, you have not successfully made hidden files show.

You should see a list like this.

Now you have several options. But before you try any of them, make a second copy of stickies.bak, stickies24h, and stickies1wk. This just helps insure that you won't accidentally dump those backup files yourself! Rename one of these three files as stickies.ini. Which one? Stickies.bak is the most recent. It will have the most up-to-date information from your stickies. Occasionally, this will be empty. In that case, chose stickies24h, which is all the data from 24 hours ago. As a last resort, stickies1wk is, logically, all the data from one week ago.

I have had stickies.bak be empty after a bad crash, but I've never had to recover anything earlier than the 24 hour file.

Sunday, March 14, 2010

New Tab Placement in FireFox 3.6


If you have downloaded FireFox 3.6 you have already discovered that one of the big changes is in where new tabs open. It used to be that if you did right-click, open in a new tab (or Cntrl click), the tab would open on the far right of your already open tabs. Now it opens right next to the page that you clicked on.

They say they made this change to help organize and group tabs together that are similar. I'm finding this hard to get used to. Sometimes it helps me organize, and sometimes it doesn't at all. I haven't decided if I will change it or not.

How do you change it, if you want to? It's not as simple as it should be, but it's not too hard. There is no way to change it under Tools/ Tabs. That is annoying.
  • Open a new tab
  • In the location bar (where you usually type a URL), type about:config, then press enter.
  • You will see a warning about changing settings and voiding your warranty. Just press "I will be careful."
  • Then you will see a screen of a lot of commands with some columns of figures or text after them. Scroll down quite a way until you find browser.tabs.insertRelatedAfterCurrent
  • You will note that its value is true. Double click that line and the value should change to false.
  • Close that tab

Your new tabs should now open to the far right again. If you ever want to change it back, just follow these same steps and change the value back to true.

Tabbed Browsing in FireFox

Wednesday, January 27, 2010

Lost Your Firefox Download Choices?


With the recent updates to the Firefox browser, I have seen several complaints from people about losing the ability to choose where downloads are placed. The fix is easy!

On the top bar choose Tools/ Options/ Main. You will see the above window in Firefox 3.5.6. Then in the middle of the window is where you can make choices about how you want downloads handled.

You can choose whether to see the downloads window, and if it should close on its own when finished. You can select a location where downloads go all the time, or you can choose to be asked where you want each download sent when it is being downloaded. That is the one that I like.

Saturday, November 28, 2009

unɟ ɹoɟ ʇsnɾ - ʇı dılɟ


˙unɟ ǝʌɐɥ ¡uoıʇɐɔılddɐ ǝlʇʇıl ʎllıs ɐ s,ǝɹǝɥ

Flip Text

web ad income Nov 26 (4 blogs, 2 web sites, writing):
Adsense $.02
Adgitize $.82
Project Wonderful $.02
Chitika $.09
Clixsense $.06
Neobux $.06
______________________
Total: $1.07

Sunday, November 22, 2009

Using Windows Picture and Fax Viewer


Windows Picture and Fax Viewer is a very handy application that I often forget about using. I thought if I reminded you about it, it would help me remember too!

Any computer with Windows XP or 2003 has it installed. In Windows Vista it has been replaced with the similar Windows Photo Gallery. It is not software for editing, but just an easy way to see the images in a folder, at a decent size, without opening editing software.


You can view the images in any folder which contains images. Acceptable formats include jpg, gif (including animated), bmp, png, wmf, emf, ico, and tiff. Open the desired folder. It doesn't matter what view is selected (eg. thumbnails, list, etc). Select any image and right click, then choose Open With/ Windows Picture and Fax Viewer. The viewer will open and you can scroll through the images that are in that folder.


There can be files in the folder that aren't images, and the viewer will ignore them. In the screen capture here you can see that I'm about to view any images that are lost on my too-busy desktop- an easy way to find an image.

Within Windows Picture and Fax Viewer you can view pictures with the best fit to the screen, make them full size, or zoom in and out. You can rotate images. You can print, save with the same or a different name, and delete images. Another choice is to close the viewer and open the image with your default image editing software.

Supposedly, in the My Pictures folder if you simply double-click on a photo file the viewer will automatically open. This may not be true. For me, a double-click just opens my photo editing program. But you can always do the right-click and Open With option.

See Microsoft Documentation for the Picture and Fax viewer.

web ad income Nov 20 (4 blogs, 2 web sites, writing):
Adsense $.01
Adgitize $.69
Project Wonderful $.04
Clixsense $.06
Neobux $.06
Microworkers $1.60
______________________
Total: $2.46

Saturday, November 21, 2009

How to Connect a Digital Projector to a Computer


I've borrowed a different digital projector a couple of times in the past few weeks, and struggled to get it working correctly with my computer. The problem is that computers have many different video cards, and getting the two electronic components to talk to each other may not be obvious. Nevertheless, there are four basic steps to follow (just for the video feed), and I'll list those here.


1. Find the connection cord, probably a 15-pin connector, and hook it between the computer and the projector. There may be two such connections on the projector (use either one), but there is probably only one on the computer. If you want the audio to run through the projector you will need to also connect that cord, and again, it should only fit in the one jack.

2. Connect both the projector and computer to a power source and turn them on. The projector will probably have a basic on/off switch, and a power/standby button. You will need to turn them both on. These should boot up independently. The projector will probably display some sort of brand logo.


3. One of three things should happen, which will determine what you do next.
A. If you are extremely fortunate, the computer screen will appear on the wall screen and you are good to go. It's unlikely that this will happen.
B. You may get a blue screen on the wall and a message that the feed has been detected. This is a good start, but not helpful for your presentation.
C. You may see the message shown above, "no input detected."

4. Send the computer display to the projector. This is the tricky one. If 3A did not happen, try the following in order.
A. Find the Input button on the projector and press it to cycle through the choices. This may get you nothing, or it may progress you to 3B.
B. Open your computer's display panel. (through the start menu, or right click on the desktop), then choose Display, then Settings.


You should see two boxes, which may not be the same size. The box with a 1 is your computer screen. The box with a 2 represents the video display. You need to select the 2 and change its size with the slider bar to match that of your computer. If you want to use the mouse as a pointer, also check the box "Extend my Windows desktop onto this monitor," and drag the numbered box so that it matches the physical position of your computer relative to the projector. (If the projector is left of the computer, drag box 2 to the left). Click "Apply." You will probably be given a countdown timer to verify that you want to make the changes. If you aren't sure, just say yes, because you can always change them again.


C. This may now present the computer on the screen. It is more likely that this will get you a blue screen, but you should be able to move the mouse and see the cursor move off the edge of the computer monitor and appear on the wall screen. This is progress!
D. You will probably need to click on "Advanced." This will open another window, and one of the tabs should have the name of your video card.


There should be several choices of settings. On the left should be a list of options. Look for the one that is similar to this one "set up multiple displays." This will open a panel with choices similar to the ones seen below.


On this list, I selected "Clone." And you can see the projector name appears in the list under point 2. Click the Apply button, and the monitor display SHOULD now appear on the wall screen.

This is not a definitive troubleshooting list. But it should solve many ordinary types of computer/projector communication problems.

My best advice is to make sure that you have PLENTY of time to get set up if you are doing a presentation with an unfamiliar digital projector.

web ad income Nov 19 (4 blogs, 2 web sites, writing):
Adsense $.01
Adgitize $.68
Project Wonderful $.03
My Survey $.10
Clixsense $.05
Neobux $.05
______________________
Total: $.92

Monday, November 16, 2009

Temporarily enlarging a page in FireFox


Would you sometimes like to make a web page just a little larger to see something better, but you don't want to change your settings, or do anything permanent? In Firefox, you can easily do this.

On the left is a section of one of my blogs at the setting where I normally keep it. On the right is a temporary enlargement. Both are 180x400 pixels, taken from a screen capture.

The way to do this is simply hold down Control and hit + to enlarge or - to shrink the page. This action will only affect the page in that one tab. The two shots I have shown are my normal view, and after hitting Control+ two times.

Mozilla- parent company of Firefox

web ad income Nov 14 (4 blogs, 2 web sites, writing):
Adsense $.01
Adgitize $.69
Project Wonderful $.05
Clixsense $.07
Chitika $.22
Neobux $.07
______________________
Total: $1.11